How to Tie a Gi Belt: Secure BJJ Knot Steps
Your gi belt isn’t just a piece of cloth keeping your jacket shut—it’s a symbol of your progress and rank, and honestly, it can be a real pain if it keeps coming undone while you’re rolling.
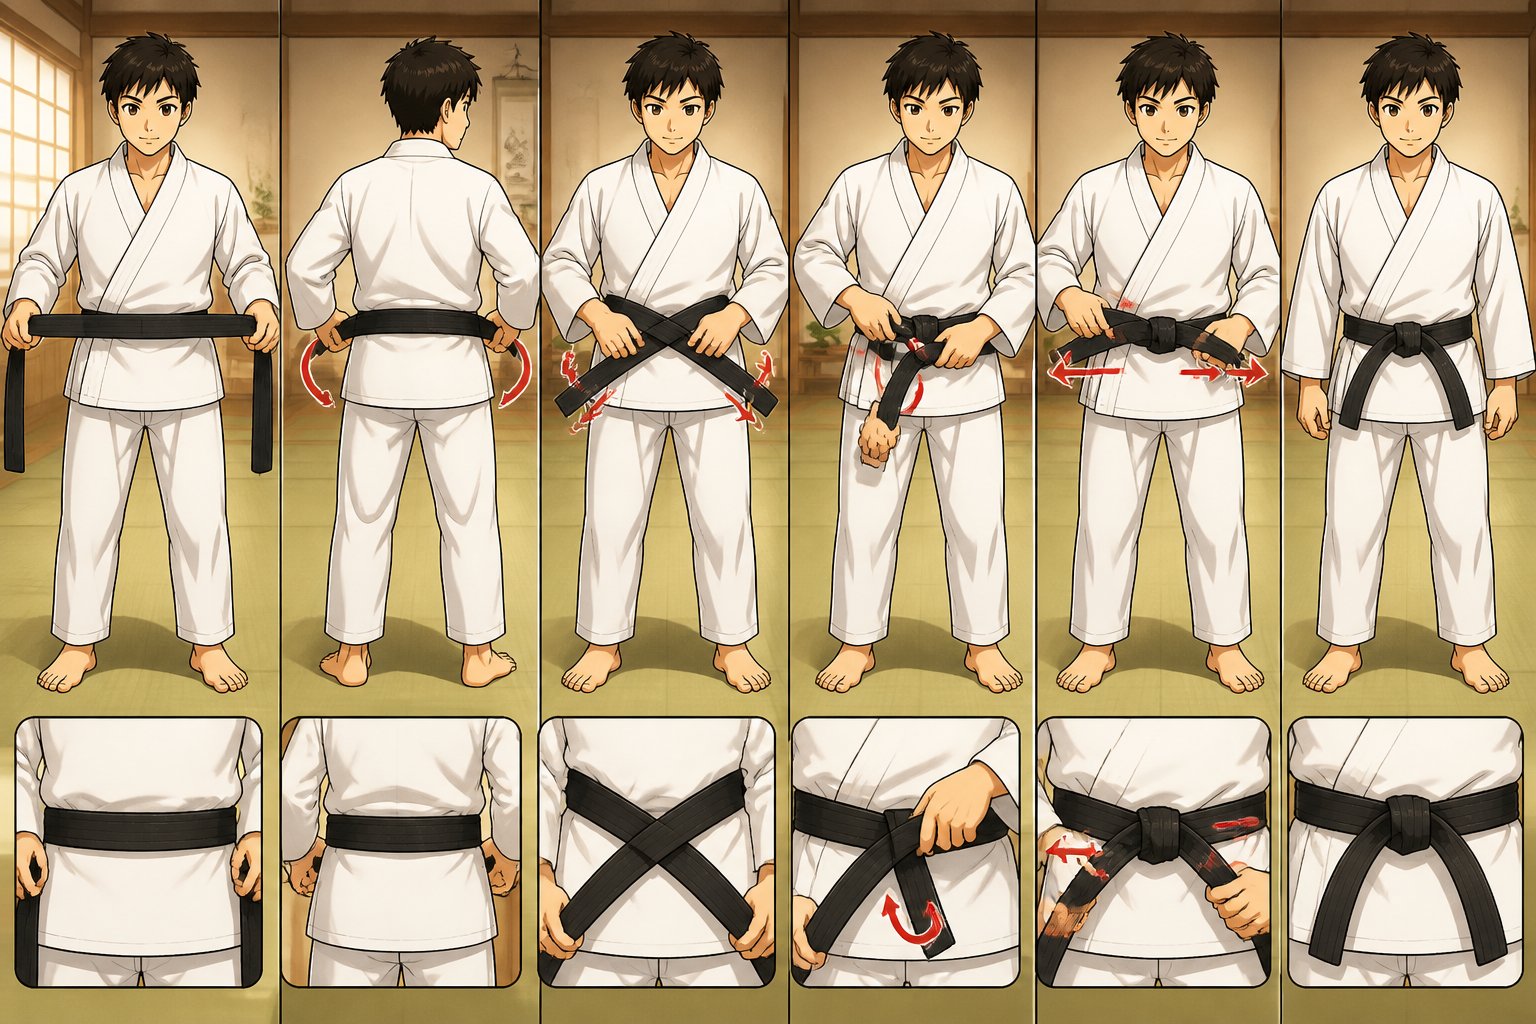
By the way, I’m an illustrator too—I draw both anime and sketch-style art, so if you ever need a visual step-by-step, I can whip one up!
To tie a gi belt, wrap it around your waist, cross the ends, thread one end under the wraps, then pull both ends tight to form a knot. It sounds simple, but I’ll admit, when I first started BJJ, I always got the steps mixed up and ended up with my belt either upside down or coming loose in the first round. Been there? You’re not alone. I remember tying it backwards for weeks—nobody tells you how fiddly it feels at first.
Once you get the hang of it, though, tying your belt becomes muscle memory. You’ll be able to do it even when you’re running late for class (which, let’s be honest, happens more often than we’d like).
The Standard Two-Wrap Square Knot
Most people in jiu-jitsu use the standard two-wrap square knot. It gives you two flat layers around your waist and a solid, square knot in the front. I’ve found this holds up even when you’re getting tossed around.
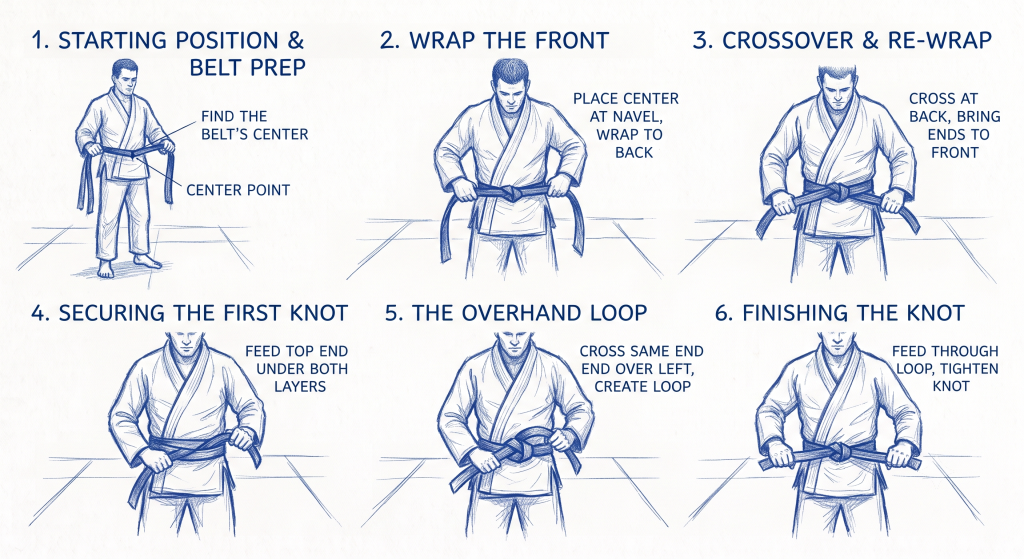
Set the Gi and Find the Belt Center
First, put on your gi and make sure the lapels line up evenly. If you don’t, the belt will never sit right.
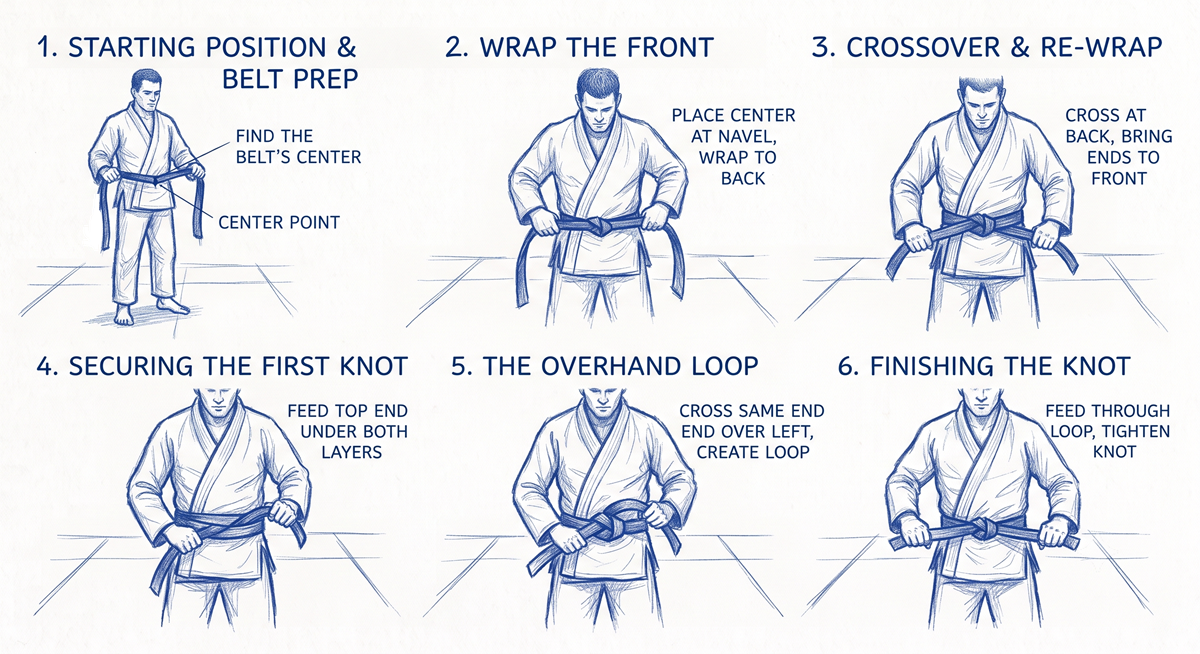
Grab both ends of your belt and fold it in half to find the center. Place that middle point right against your stomach—believe me, if you skip this, you’ll end up with one tail way longer than the other. I’ve made that mistake more times than I can count.
Wrap Two Flat Layers Around the Waist
Now, wrap both ends around your waist, crossing them behind your back, and bring them around to the front. Keep the belt flat as you go—twisted belts look sloppy and feel uncomfortable.
One thing I used to mess up was grabbing just one layer when tightening, which makes the belt uneven. Always pull both layers together so the belt sits snug and balanced.
Pull it firm, but not so tight you can’t breathe. You want to train, not pass out.
Thread the Top End Through Both Layers
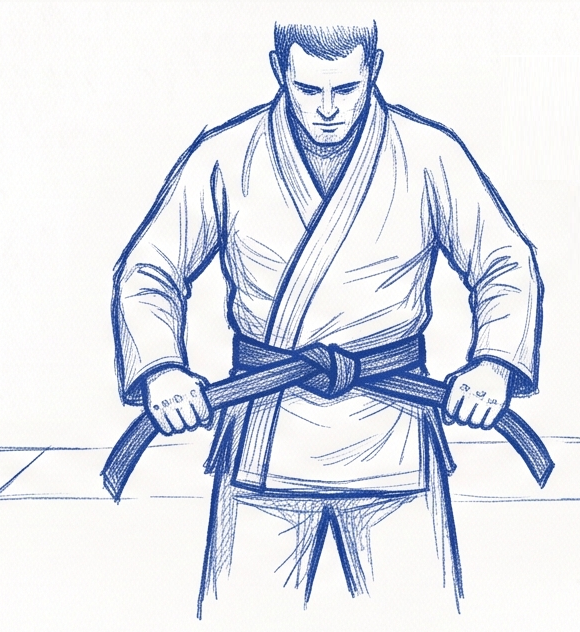
With the belt wrapped, take the end that sits on top, cross it over the other end to make an X at your stomach, and then thread that top end under both belt layers. Pull it through so it pops out the other side.
This step is what keeps the belt from unraveling mid-roll. If you only go under one layer, you’ll spend half your class re-tying your belt. Trust me, I learned that the hard way.
Finish and Tighten the Square Knot
Now you’ve got two ends ready to tie. Cross them again to make another X, then tie a standard square knot—one end over and under, then the other end mirrors it in the opposite direction. Don’t just tie any old knot; a granny knot slips loose, and you’ll regret it mid-spar.
Pull both ends tight so the knot sits flat against your stomach. If it’s bulky or twisted, start over. Most belt issues come from a sloppy knot, and it’s worth the extra few seconds to fix it.
Check Knot Position and Even Belt Ends
Take a look at your knot. It should sit centered on your stomach, not off to one side. Both belt ends should hang down at about the same length. If not, untie it and reset from the beginning—it’s a pain, but it’s the only way to get it right.
Some schools care about which side the logo or stripes face. If you’re not sure, ask your instructor. Every academy has its quirks.
A neat, centered knot with even ends just looks better and feels better. You start to take pride in it after a while.
Fit, Reliable Alternatives, and Common Fixes
A good gi belt fit means it stays put, sits level, and doesn’t loosen up every five minutes. Most problems are easy to fix with a few tweaks.
Choose the Right Belt Length and Tension
Your belt should wrap around your waist twice, with enough left to tie a knot. If the ends are too short or lopsided, the belt size is probably off for your waist or gi. Most brands list belt lengths, so check before you buy. After tying, both ends should hang between 8 and 12 inches—not too long, not too short.
Pull the belt firm enough so it won’t budge during movement, but not so tight you can’t move or breathe. Even tension on both sides helps keep everything in place.
Prevent Twists, Uneven Tails, and Loose Knots
Twisted layers? Super common. Before you tie the knot, make sure both wraps are flat—no folds or twists. Uneven tails usually mean you started with the belt off-center. Always line up the midpoint with your belly button before wrapping.
Loose knots happen when you skip the step of tucking the end through both layers. If your belt keeps coming undone, check for these common mistakes:
- Not wrapping twice around the waist
- Only crossing the belt once, so there’s no real knot
- Not pulling both ends tight in opposite directions
Fixing these usually solves 90% of belt problems. I wish someone had told me that earlier.
Use the Karate-Style Tie When Appropriate
The karate-style belt tie is a bit different—it’s neater and flatter, so it looks sharp for photos or formal events. Line up one end with your right lapel, wrap the other end around twice, then tuck it under the layers from bottom to top. The finished knot looks super clean, which is great for grading ceremonies or tournaments. For everyday training, though, I stick to the standard tie—it’s faster and works just as well.
Compare the Relson Gracie and Hollywood Knots
There are a couple of belt tying methods that get tossed around in BJJ circles. The Relson Gracie knot adds an extra loop for a locked-in feel—it’s not coming undone even if you’re in a scramble. The Hollywood knot, popularized by folks like Rener Gracie, is all about a flat, tidy look and ties up quickly, but it might loosen if you’re rolling hard.
| Knot Style | Security | Speed to Tie | Best For |
|---|---|---|---|
| Relson Gracie | High | Moderate | Competition, hard rolling |
| Hollywood | Moderate | Fast | Casual training, light drilling |
Try both and see which one fits your style and training intensity. For me, I switch it up depending on the day. Sometimes you just want to get on the mat and not fuss with your belt for ten minutes, right?
Follow Gym and Competition Expectations
Every gym seems to have its quirks about how they want you to tie your belt—especially when you’re moving up from white to brown or black. I remember when I first started BJJ, I actually tied my belt the wrong way for weeks. It’s a bit embarrassing looking back, but hey, everyone’s been there. If you’re unsure, just ask your instructor or a more experienced teammate before grading or a tournament. Saves you the awkwardness later.
For competitions, especially under organizations like IBJJF, they’re strict about your belt staying on and tied properly throughout the match. If your belt keeps coming undone, it could even cost you points or earn you a warning. Not fun.
Honestly, bringing a backup belt to tournaments is just smart. Belts can fray or even snap at the worst times. I always check my belt security before matches—takes a few seconds and can save you a lot of hassle once things get going.
By the way, aside from training and writing about BJJ, I’m also an illustrator. I love sketching, and I draw both traditional sketches and anime—so if you see any artwork here, yep, that’s my own hand at work!